
There’s nothing quite like the smell of fresh bagels in the morning – unless you’re like me and dread the long rise times and messy yeast. That’s why Greek yogurt bagels became my breakfast game-changer! These magical little rounds come together with just two main ingredients (yes, really!), no waiting around for dough to proof, and they’re packed with protein to keep you full all morning. I discovered this recipe during one of those chaotic weeks when my kids needed quick breakfasts before school, and now we make them almost every Sunday. Who knew something so simple – thick Greek yogurt and self-rising flour – could transform into chewy, golden bagels that rival the bakery? The best part? You probably have everything you need in your kitchen right now.
Why You’ll Love These Greek Yogurt Bagels
Trust me, once you try these bagels, you’ll wonder how you ever lived without them! Here’s why they’re my absolute favorite:
- Two-ingredient magic: Just yogurt and flour – no fancy equipment or hard-to-find ingredients
- Protein-packed breakfast: Each bagel delivers 10g of protein to keep you satisfied
- No yeast, no problem: Skip the waiting and kneading – these come together in minutes
- Crispy outside, chewy inside: That perfect bagel texture without the bakery price tag
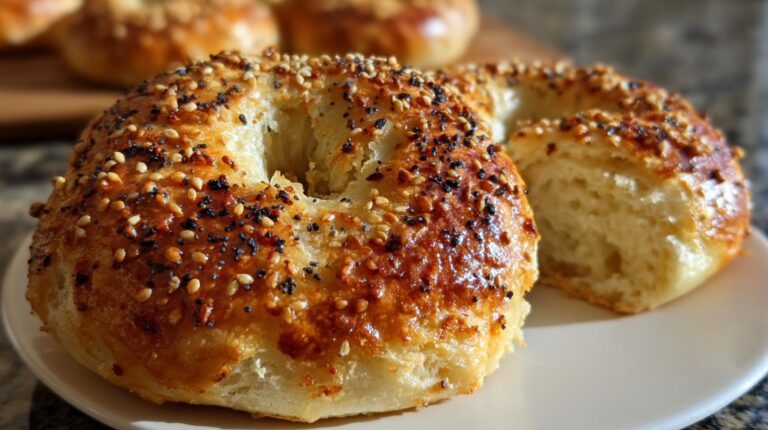
- Endless flavor options: Top with everything seasoning, sesame seeds, or get creative with cinnamon sugar
- Kid-approved: My picky eaters go crazy for these (especially when they help shape them!)
Ingredients for Greek Yogurt Bagels
Here’s the beautiful part – you only need a handful of simple ingredients to make these magical bagels happen! But listen closely, because choosing the right versions makes all the difference. I learned this the hard way after a disastrous batch with runny yogurt – trust me, you want thick Greek yogurt here.
- 1 cup thick plain Greek yogurt (2% or whole milk – the fat content matters for texture!)
- 1 cup packed self-rising flour (no substitutions here unless you want flat bagels – more on that later)
- 1 large egg, beaten (just for that gorgeous golden egg wash)
Now for the fun part – toppings! Pick your favorite:
- Everything bagel seasoning (my personal obsession)
- Sesame seeds
- Poppy seeds
- Coarse sea salt
- Minced garlic or onion flakes
See? Nothing fancy – just pantry staples that come together to create something extraordinary. Pro tip: measure your flour by spooning it into the cup and leveling off – packing it down too much can make your dough dry.
How to Make Greek Yogurt Bagels
Okay, let’s get our hands dirty! Making these bagels is so simple you’ll laugh – but there are a few key steps that make all the difference between “meh” and “wow!” I’ve made every mistake possible (flat bagels, tough bagels, you name it) so you don’t have to.
Mixing the Dough
First things first – preheat that oven to 375°F and line your baking sheet with parchment paper. Trust me, you don’t want to be shaping bagels while waiting for the oven to heat!
Now, dump your Greek yogurt and self-rising flour into a big bowl. At first, it’ll look like a complete disaster – like there’s no way this will ever become dough. That’s perfect! Use a sturdy spoon (or your hands – I always end up using my hands) to mix until it forms a shaggy, sticky mess. This is exactly what you want – don’t panic!
Dump the shaggy dough onto a lightly floured surface and knead for just 1-2 minutes. You’re looking for it to become smooth but still slightly tacky. Here’s the crucial part: stop kneading the second it comes together! Overworking makes tough bagels, and nobody wants that.
Shaping and Topping
Divide your dough into 4 equal pieces – I like to weigh them to be precise, but eyeballing works too. Roll each piece into a rope about 6 inches long. Now, here’s my little trick: wet your fingers slightly and pinch the ends together to form a circle. The water helps them stick better!
Place your bagel babies on the prepared baking sheet. Now for the magic touch – beat that egg with a fork until it’s completely smooth. Using a pastry brush (or your fingers in a pinch), brush a thin, even layer of egg wash over each bagel. This gives them that gorgeous golden shine! Sprinkle your toppings generously – don’t be shy!
Baking the Bagels
Pop them in the oven and set your timer for 20 minutes. Around the 15-minute mark, your kitchen will start smelling amazing! At 20 minutes, check for that perfect golden brown color. If they need another 2-5 minutes, give it to them – but watch closely!
Here’s the hardest part: let them cool for at least 5 minutes before slicing. I know, I know – the smell is torture! But cutting too soon makes them gummy. While you wait, brew some coffee or tea – these bagels deserve a proper breakfast moment!
Tips for Perfect Greek Yogurt Bagels
After making these bagels more times than I can count (and yes, burning a batch or two), I’ve learned all the tricks to get them just right every single time. Here are my hard-earned secrets:
- Yogurt matters! Use thick Greek yogurt (2% or whole milk) – the thin stuff makes sticky dough that’s impossible to work with. I learned this after a particularly messy kitchen disaster!
- Knead with care. Stop the second the dough comes together – over-kneading makes them tough. I set a timer for 2 minutes max to keep myself honest.
- Flour smartly. Dust your hands and surface lightly – too much flour dries out the dough. If it sticks a little, that’s actually perfect!
- Get creative with toppings. My kids love mixing everything seasoning with grated Parmesan, while I’m obsessed with za’atar lately. The options are endless!
- Egg wash is key. Don’t skip it! That thin, even layer gives the signature bakery-style shine. Pro tip: add a pinch of salt to the egg wash for extra flavor.
One last thing – don’t stress if your first batch isn’t perfect! Even my lumpy early attempts still tasted amazing. The beauty of these bagels is how forgiving they are once you get the basics down.
Greek Yogurt Bagel Variations
Oh, the fun really begins when you start playing with flavors! My family loves experimenting with these bagels – here are our favorite twists:
- Savory: Mix 1 tsp garlic powder into the dough and top with rosemary
- Sweet: Add 1 tbsp cinnamon and drizzle with honey after baking
- Cheesy: Fold in ¼ cup shredded cheddar for the ultimate grilled cheese bagel
- Everything: Go wild with the seasoning blend – I sometimes add crushed red pepper for heat!
The possibilities are endless – what will you try first?
Storing and Reheating Greek Yogurt Bagels
Here’s the beautiful thing about these bagels – they stay fresh longer than you’d think! But let me tell you how to keep them tasting like they just came out of the oven. First, make sure they’re completely cooled before storing (I learned this the hard way when I got impatient and ended up with soggy bagels – oops!).
For storage, grab an airtight container or zip-top bag. They’ll stay perfect at room temperature for about 3 days. If you want them to last even longer (though let’s be honest, they rarely make it that long in my house), pop them in the fridge for up to a week.
Now, here’s my favorite trick for reheating: toast them! That quick blast of heat brings back that wonderful crispy exterior while keeping the inside soft and chewy. I usually do a medium setting on my toaster – just enough to warm through without drying them out. If you’re feeling fancy, you can even brush them with a tiny bit of butter before toasting for extra richness.
Freezing works like a charm too! Just wrap each cooled bagel individually in plastic wrap, then toss them all in a freezer bag. They’ll keep for about a month. When you’re ready to eat, no need to thaw – just toast straight from frozen. It’s like having fresh bagels on demand!
Nutritional Information
Now let’s talk numbers – because I know you’re wondering just how good these Greek yogurt bagels really are for you! Before we dive in, remember these are estimates based on my typical ingredients. Your exact numbers might vary slightly depending on your yogurt brand or flour choice.
Here’s the breakdown per bagel (and trust me, you’ll want the whole thing – they’re too good to share!):
- Calories: About 190 (perfect for a satisfying breakfast)
- Protein: 10g (thanks to that Greek yogurt power!)
- Carbohydrates: 35g (with 1g fiber)
- Sugar: Just 2g naturally occurring (no added sugar here)
- Fat: Only 1g (unless you go wild with toppings – no judgment!)
What I love most is how these stack up against traditional bagels – way more protein, less sugar, and none of that empty carb feeling an hour later. My nutritionist friend actually approved these (after eating three in one sitting – true story!).
Pro tip: If you’re watching sodium, look for lower-sodium self-rising flour or make your own blend. The everything seasoning adds some salt too, so you can always go lighter there if needed.
FAQ About Greek Yogurt Bagels
I get so many questions about these magical bagels – and trust me, I’ve tested all the variations so you don’t have to! Here are the answers to everything you’ve been wondering:
Can I use regular yogurt instead of Greek yogurt?
Oh honey, don’t even think about it! I made this mistake once and ended up with a sticky mess that wouldn’t hold shape. Greek yogurt’s thick texture is absolutely essential – it’s got the perfect protein content and moisture level. If you’re in a pinch, you can strain regular yogurt through cheesecloth for a few hours, but honestly? Just grab the Greek yogurt.
Why self-rising flour? Can I use all-purpose?
Here’s the deal – self-rising flour already has the perfect amount of leavening agents mixed in, which means no fussing with baking powder measurements. If you must use all-purpose, you’ll need to add 1½ tsp baking powder and ¼ tsp salt per cup of flour. But honestly? Keep it simple and grab the self-rising – it’s worth it!
Can I freeze these bagels?
Absolutely! These freeze like a dream – just wrap each cooled bagel individually in plastic wrap, then toss them all in a freezer bag. They’ll stay perfect for about a month. When you’re ready to eat, pop them straight from freezer to toaster (no thawing needed) and they’ll taste freshly baked!
Why are my bagels flat/dense?
Oh, I’ve been there! Usually this happens if your yogurt was too thin or you overworked the dough. Remember – mix just until combined, knead gently for 1-2 minutes max, and use that thick Greek yogurt we talked about. Also make sure your self-rising flour is fresh – old baking powder loses its oomph!
Can I make these gluten-free?
I’ve experimented with gluten-free flour blends, and while they work, the texture changes quite a bit. You’ll get denser, more crumbly bagels that don’t have that classic chew. If you try it, look for a gluten-free self-rising blend and maybe add an extra egg white to help bind everything together.
Ready to Bake Your Own Greek Yogurt Bagels?
There you have it – everything I’ve learned through countless batches of these magical Greek yogurt bagels! From my first lumpy attempt to the perfectly golden rounds I make now, every step has been worth it. These bagels have become such a staple in our home that my kids actually request them by name (and that’s saying something with picky eaters!).
Now it’s your turn to experience the magic of two-ingredient bagels that actually taste like you spent hours in the kitchen. Trust me, once you taste that first warm, chewy bite topped with crispy everything seasoning, you’ll be hooked just like we are. Don’t be surprised if you find yourself making them every weekend – I certainly do!
I’d love to see your creations! Snap a photo of your beautiful Greek yogurt bagels and tag me – I get so excited seeing all the different topping combinations people come up with. Happy baking, friends! May your bagels be golden, your yogurt be thick, and your mornings be delicious.
Print
2-Ingredient Greek Yogurt Bagels: Magically Easy & Delicious
- Total Time: 32 minutes
- Yield: 4 bagels 1x
- Diet: Low Fat
Description
Fluffy and healthy Greek yogurt bagels made with just two ingredients. These easy homemade bagels require no yeast and are packed with protein.
Ingredients
- 1 cup plain Greek yogurt (thick, preferably 2% or whole)
- 1 cup self-rising flour
- 1 egg, beaten (for egg wash)
- Toppings (choose one): Everything bagel seasoning, sesame seeds, poppy seeds
Instructions
- Preheat oven to 375°F. Line a baking sheet with parchment paper.
- In a bowl, mix Greek yogurt and self-rising flour until a shaggy dough forms.
- Transfer to a lightly floured surface and knead 1–2 minutes until smooth (add a little flour if sticky).
- Divide into 4 equal pieces. Roll each into a rope and pinch ends together to form a bagel shape.
- Place on the baking sheet. Brush tops with beaten egg and sprinkle with desired topping.
- Bake 20–25 minutes until golden brown and cooked through. Cool a few minutes before slicing.
Notes
- Use thick Greek yogurt for best results.
- Knead just enough to form a smooth dough—overworking can make them tough.
- Customize with your favorite toppings.
- Prep Time: 10 minutes
- Cook Time: 22 minutes
- Category: Breakfast
- Method: Baked
- Cuisine: American
Nutrition
- Serving Size: 1 bagel
- Calories: 190
- Sugar: 2g
- Sodium: 300mg
- Fat: 1g
- Saturated Fat: 0.5g
- Unsaturated Fat: 0.5g
- Trans Fat: 0g
- Carbohydrates: 35g
- Fiber: 1g
- Protein: 10g
- Cholesterol: 30mg