

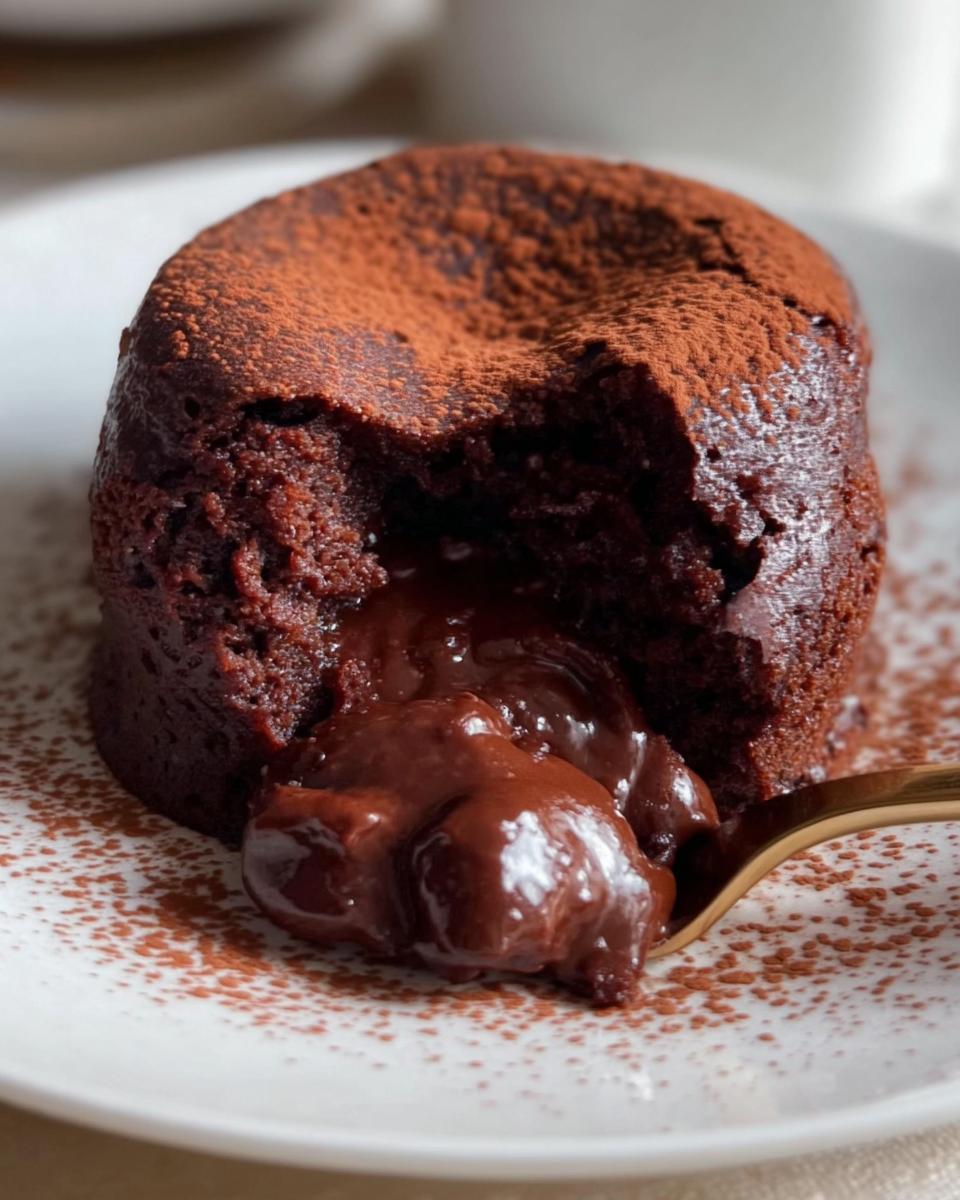
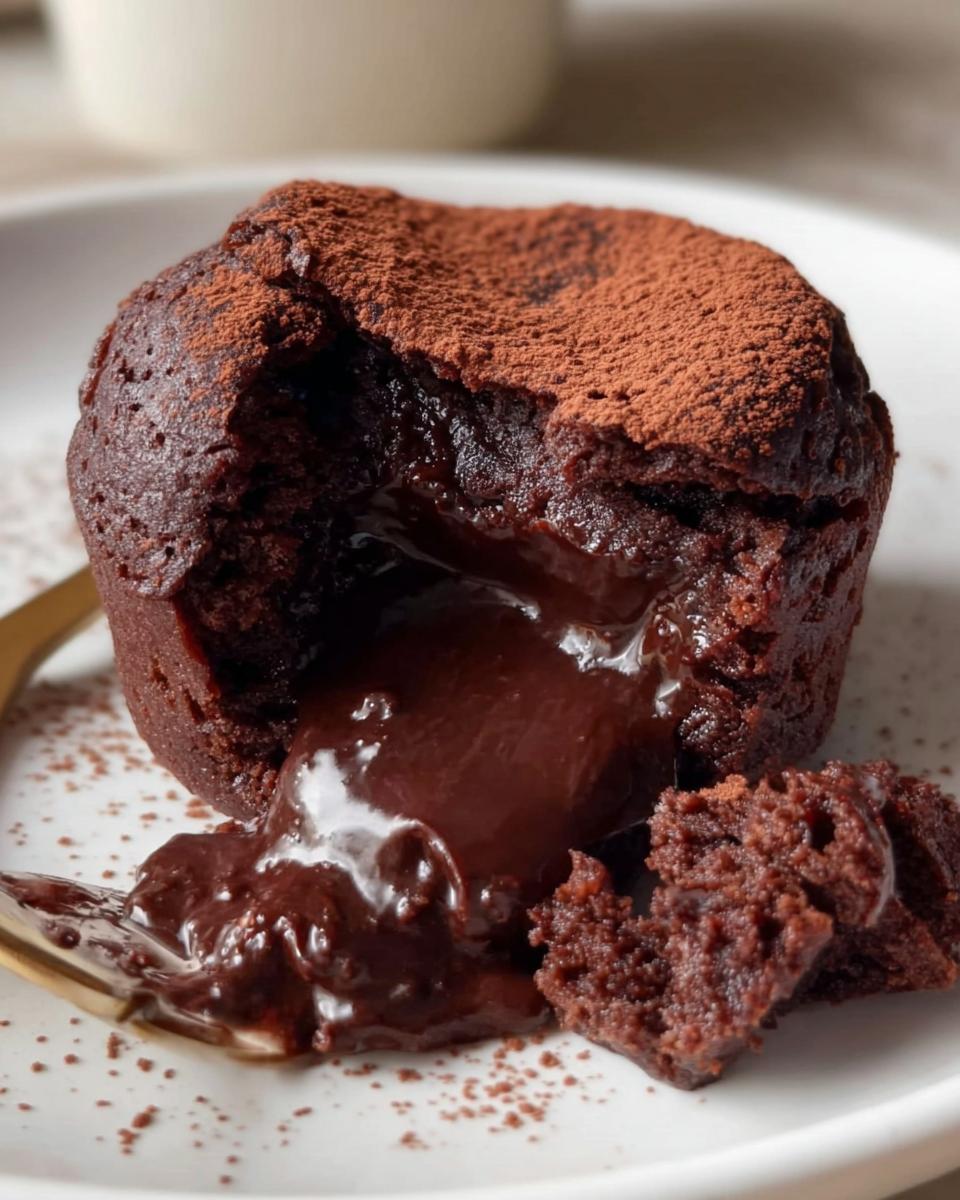
There’s nothing quite like breaking into a warm chocolate lava cake and watching that rich, molten center ooze out. I still remember the first time I had one—a tiny Parisian café, the cake arriving piping hot with a scoop of vanilla ice cream melting beside it. That moment changed my dessert life forever. Now I make them at home in just 22 minutes flat—because who can wait when chocolate cravings strike? After testing dozens of variations, I’ve nailed the perfect bake time (12 minutes max!) for that glorious liquid center. This isn’t just dessert—it’s a chocolate emergency kit disguised as a ramekin.
Why You’ll Love This Chocolate Lava Cake
Listen, I know you could buy a fancy lava cake at some restaurant—but once you taste this homemade version, you’ll never go back. Here’s why this recipe has become my go-to for chocolate emergencies (and let’s be honest, Tuesday nights):
- Single-serving perfection: No sharing required! This little cake is all yours—no leftovers tempting you from the fridge at midnight. (Okay, maybe that’s just me.)
- 22 minutes from craving to eating: Seriously, by the time you’ve found your favorite spoon, this bad boy is ready. Faster than waiting for delivery!
- That magical molten center: When you crack it open and that river of warm chocolate comes pouring out? Pure happiness in every bite.
- Pantry superhero: Chocolate, butter, eggs, flour—chances are you’ve got everything right now. No fancy ingredients, just big chocolate flavor.
Oh, and the best part? It’s nearly impossible to mess up. Even my “I can’t bake” friends nail this recipe on their first try. Trust me—your future self will thank you for bookmarking this page.
Chocolate Lava Cake Ingredients
Here’s the beautiful part—you only need a handful of simple ingredients to make pure chocolate magic. But let me tell you, quality matters here! I learned this the hard way when I tried using bargain-bin chocolate chips once. Never again!
- 1/2 cup semi-sweet chocolate chips (or chop up a good chocolate bar—I’m partial to Ghirardelli or Guittard)
- 1/4 cup unsalted butter (the real stuff, please—it makes all the difference)
- 1/4 cup sugar (regular granulated works great)
- 1 large egg (room temperature—just leave it out for 10 minutes before you start)
- 1 egg yolk (this is my secret for extra richness)
- 1/4 tsp vanilla extract (the good stuff, not imitation—trust me, you’ll taste the difference)
- 2 tbsp all-purpose flour (spoon it into the measuring cup and level it off—no packing!)
- Pinch of salt (about 1/8 tsp—it makes the chocolate flavor pop)
- Cocoa powder (for that gorgeous dusting on top—Dutch-processed is my fave)
- Optional: extra ganache (because sometimes more chocolate is the answer)
A quick pro tip—measure everything before you start melting the chocolate. This recipe moves fast once the butter and chocolate are warm and melty (just like my heart when I eat this cake). And don’t stress if you’re missing the egg yolk—the cake will still be delicious without it, just slightly less decadent.
Equipment You’ll Need
Okay, let’s talk tools! The beauty of this chocolate lava cake is that you don’t need fancy equipment—just a few basics that you probably already have in your kitchen. Here’s what I grab every time I make this (usually while my oven is preheating because, hello, chocolate emergency):
- Microwave-safe bowl – Glass is my go-to because I can see the chocolate melting, but any microwave-safe dish works. Just no metal, obviously!
- 8-ounce ramekin or large mug – I’ve got this cute little ceramic ramekin I use, but a sturdy coffee mug works just as well. Bonus points if it’s pretty—we eat with our eyes first!
- Whisk – A small one is perfect for this job. I’ve used a fork in a pinch, but a whisk mixes everything so much smoother.
And for those who want to get fancy (like when I’m pretending I’m on a cooking show):
- Sifter or fine mesh strainer – For that Instagram-worthy cocoa powder dusting on top. Though honestly, I’ve just tapped a spoonful of cocoa over the cake many times—it still tastes amazing!
- Rubber spatula – Helps scrape every last bit of that glorious batter into the ramekin. No chocolate left behind!
That’s it! No stand mixer, no special pans—just simple tools for maximum chocolate satisfaction. Now let’s get to the good part—making that molten magic happen!
How to Make Chocolate Lava Cake
Alright, let’s get to the fun part—making that gorgeous, gooey chocolate masterpiece! I promise it’s easier than you think, but there are a few key steps that’ll make all the difference between “pretty good” and “OMG I need another one.” Follow these steps, and you’ll be swimming in chocolatey bliss in no time.
Melting the Chocolate and Butter
First things first—let’s get that chocolate nice and melty. I used to try doing this all at once and ended up with scorched chocolate more times than I’d like to admit (RIP, many chocolate bars). Here’s the foolproof way:
Chop your chocolate if you’re using a bar (or just grab those chips) and toss them in a microwave-safe bowl with the butter. Microwave in 30-second bursts, stirring well between each. Usually takes me about 90 seconds total, but microwaves vary. Stop when it’s about 90% melted—the residual heat will finish the job as you stir. You want it smooth and glossy, not hot and bubbly. Pro tip: If it gets too hot, add a couple unmelted chocolate chips to cool it down while stirring.
Combining Wet and Dry Ingredients
Now for the magic transformation! Whisk in the sugar first—it’ll look a bit grainy at this point, but don’t worry. Then add the whole egg, extra yolk, and vanilla. This is when the mixture suddenly turns into this gorgeous, silky batter that makes me want to dive in right then (resist the urge!).
Here’s the crucial part—add the flour and salt. Fold gently with a spatula just until no white streaks remain. I mean it—no vigorous mixing! Overworking the flour makes the cake tough instead of that perfect tender-crisp exterior we want. A few tiny lumps are totally fine—they’ll disappear in baking.
Baking for the Perfect Molten Center
Preheat your oven to 375°F (190°C) with a rack in the middle position—this ensures even heat. While it heats, butter your ramekin well (I use my fingers—no shame!) and dust with a bit of cocoa powder. Pour in that glorious batter—it should fill about 3/4 of your vessel.
Now the most important step: bake 10–12 minutes only. Set a timer! At 10 minutes, check—the edges should look set, but the center will still jiggle slightly when you gently shake the ramekin. That jiggle is your molten gold waiting to happen. If you wait until it looks “done,” you’ve gone too far—this isn’t a regular cake! When in doubt, err on the side of underbaking by a minute.
Let it cool for exactly 1 minute (any longer and it keeps cooking, any shorter and you’ll burn your mouth—experience speaking here). Run a knife around the edge, invert onto a plate if you’re fancy, or just grab a spoon and dig in directly from the ramekin like I usually do. That first spoonful of warm, flowing chocolate? Pure happiness.
Tips for the Best Chocolate Lava Cake
After making more chocolate lava cakes than I can count (for “research purposes,” obviously), I’ve picked up some game-changing tricks that’ll take yours from good to “can I have your recipe?” status. Here are my top three secrets:
Chill the batter if it’s too runny
Ever poured your batter and thought, “Hmm, this looks more like chocolate soup?” Been there! If your mixture seems too thin after mixing (usually happens on warm days), just pop it in the fridge for 10 minutes. The butter firms up slightly, giving you that perfect thick-but-pourable consistency. Just don’t forget about it—I once left mine for an hour and had to re-microwave the whole thing. Not my finest baking moment.
Dark chocolate for intense flavor
While semi-sweet works great, swapping in dark chocolate (60-70% cacao) creates this incredible depth of flavor that makes people think you trained in Paris. The slight bitterness balances the sweetness perfectly. My favorite trick? Use half semi-sweet and half dark—you get the best of both worlds. Just don’t go above 70% unless you like your desserts intense enough to stare back at you.
When in doubt, underbake by 1 minute
Here’s the golden rule: it’s better to have a slightly underbaked center than an overcooked cake. Ovens lie—yours might run hot or cold. If you’re unsure at the 10-minute mark, pull it out. The cake keeps cooking from residual heat anyway. Worst case? You get extra lava (which, let’s be honest, is never actually a problem). I keep a sticky note on my oven that says “12 MINUTES MAX” because my past self needed the reminder.
Bonus tip from my many “experiments”: Let the cake sit for exactly 60 seconds after baking—any longer and the molten center starts setting up, any shorter and you’ll burn your tongue. Ask me how I know!
Serving Suggestions
Now for the best part—how to serve this glorious chocolate lava cake! Sure, you could eat it straight from the ramekin with a spoon (no judgment—I do this at least twice a week), but let me share my favorite ways to dress it up when I’m feeling fancy or have company coming over.
Vanilla ice cream is non-negotiable in my book. That hot-cold contrast when the warm chocolate hits the creamy ice cream? Absolute perfection. I always keep a pint in my freezer just for these emergencies. Bonus: The melting ice cream creates this irresistible chocolate sauce at the bottom of the bowl that you’ll want to drink with a straw.
For something fresher, try a handful of raspberries or strawberries on the side. The tartness cuts through all that rich chocolate beautifully. Sometimes I’ll even toss the berries with a tiny bit of sugar and lemon juice while the cake bakes—they get all syrupy and amazing.
Right before serving, I love dusting the top with a light snowfall of cocoa powder. Use a small sieve or just pinch some between your fingers—it makes it look so professional! For special occasions, I’ll add a sprig of mint or a dusting of powdered sugar too.
My husband’s favorite variation? A drizzle of salted caramel sauce over the top. The sweet-salty-chocolate combo is next-level. Just warm the caramel slightly so it flows beautifully over the cake’s dome. Warning: This may result in requests to make it weekly.
Pro tip: If you’re serving guests, place the ramekin on a small plate with all the toppings on the side—it lets everyone customize their perfect bite. And make extra! Nothing’s sadder than watching someone else enjoy this cake while you’re left with just the smell.
Chocolate Lava Cake FAQ
I get asked the same questions every time I make these lava cakes—probably because everyone wants their cake to turn out perfectly gooey! Here are the answers to all those burning chocolatey questions (and a few you didn’t know you had):
Can I make chocolate lava cake ahead of time?
Oh honey, no—this is a fresh-from-the-oven kind of treat! The magic is in that molten center, which starts setting up as soon as it cools. I tried prepping the batter once and refrigerating it—big mistake. The texture was all wrong, and the center baked solid. If you’re having guests, just measure all your ingredients beforehand so you can whip it up quickly after dinner.
How do I double or triple this recipe?
Good news—it scales perfectly! Just multiply all ingredients by however many cakes you want (I often do four for my chocolate-loving family). The key is using separate ramekins—don’t try baking one giant lava cake unless you want a lava-less disaster. They might need an extra minute or two in the oven since multiple ramekins affect airflow. Pro tip: Rotate them halfway through for even baking.
What if I don’t have eggs?
Panic not! Mix 1 tablespoon flaxseed meal with 3 tablespoons water, let it sit for 5 minutes until gel-like, then use it in place of the egg. The texture changes slightly—it’s more fudgy than custardy—but still delicious. My vegan friend swears by this version with dairy-free chocolate too. Just don’t skip the egg yolk substitute if you can help it—that’s what gives the molten effect.
Why did my center bake solid?
Ah, the heartbreak! Usually means either overbaking (set that timer!), oven’s too hot (get an inexpensive oven thermometer—game changer!), or overmixing the batter (gentle folds only). Next time, check at 9 minutes—better slightly under than over. And don’t peek constantly! Every oven door opening drops the temperature.
Can I use a mug instead of a ramekin?
Absolutely! Just make sure it’s oven-safe (check the bottom for temperature ratings). My favorite coffee mug works perfectly—about 3/4 full with batter. Ceramic takes slightly longer to bake than porcelain ramekins, so add 1-2 minutes if needed. Bonus: You can pretend you’re at a fancy café eating straight from the “dish.”
Still have questions? Slide into my DMs anytime—I’ve made every mistake so you don’t have to! Nothing makes me happier than hearing your lava cake success stories (or helping troubleshoot the occasional baking disaster). Now go forth and create chocolate magic!
Storage and Reheating
Let’s be real—this chocolate lava cake is at its absolute best when it’s fresh from the oven, with that molten center practically begging to be devoured. I’m not gonna lie to you—storing it is like trying to save fireworks for later. But! If you somehow find yourself with leftovers (who are you and how?), here’s how to handle them:
Best case scenario: Eat it all immediately. No regrets. The texture changes as it cools—that glorious liquid center starts to set up, and while still delicious, it’s just not the same experience.
If you must store it: Let it cool completely, then wrap tightly in plastic wrap. It’ll keep at room temperature for a few hours, or refrigerate for up to 2 days. But fair warning—it’ll lose that signature lava flow magic.
Reheating hack: When the chocolate craving strikes, microwave that leftover cake for 10-15 seconds—just enough to warm it through without overcooking. You might get a hint of that molten texture back! I’ve found sprinkling a few drops of water on top before microwaving helps prevent dryness.
Pro tip from my many “experiments”: The batter itself can be mixed ahead and kept in the fridge for a few hours before baking—just give it a good stir and add a minute or two to the baking time. But honestly? This recipe is so quick, you’re better off making it fresh when the chocolate craving strikes. Trust me, your future self will thank you!
Nutritional Information
Okay, let’s talk numbers—but let’s not get too hung up on them, because let’s be honest, when that molten chocolate is calling your name, calories become more of a suggestion than a rule! Still, I know some of you like to keep track, so here’s the breakdown per serving (that’s one glorious lava cake all to yourself):
- Calories: About 430 (worth every single one!)
- Fat: 25g (hey, good chocolate needs good butter)
- Saturated Fat: 15g (this is a treat, not a salad)
- Carbs: 45g (mostly from that heavenly chocolate)
- Sugar: 30g (it’s dessert—what did you expect?)
- Protein: 6g (eggs count as protein, right?)
Important note: These are estimates based on standard ingredients—your exact numbers might vary depending on the chocolate and butter you use. I once calculated it with different brands and got a 50-calorie difference! Also, if you add ice cream (which you absolutely should), well… let’s just call that “optional nutritional enhancement.”
My philosophy? Life’s too short to stress over dessert nutrition facts. This is about pure, unapologetic chocolate joy in reasonable portions (though I won’t judge if you “accidentally” make two). Enjoy every gooey bite!
Enjoy Your Chocolate Lava Cake
Now comes the best part—digging into that warm, gooey chocolate paradise you just created! I want to hear all about your lava cake adventures. Did yours have that perfect molten river when you cracked it open? Maybe you discovered an amazing new topping combination? Snap a photo and tag me—I live for these chocolate success stories!
If this recipe hit the spot (and I’m betting it did), leave a star rating below so other chocolate lovers can find it too. Nothing makes me happier than knowing my late-night chocolate experiments are bringing joy to other people’s kitchens. And hey, if you’ve got a brilliant tweak—like adding a sprinkle of sea salt or swapping in hazelnut spread—share it in the comments! We’re all here for the love of molten chocolate.
Most importantly? Enjoy every messy, chocolatey bite. This isn’t just dessert—it’s a 12-minute vacation from reality. Now if you’ll excuse me, I think it’s time for my third “test batch” today… for quality assurance purposes, obviously.
Print
22-Minute Chocolate Lava Cake That Melts Hearts Instantly
- Total Time: 22 minutes
- Yield: 1 serving 1x
- Diet: Vegetarian
Description
A rich, gooey chocolate lava cake with a molten center, perfect for chocolate lovers.
Ingredients
- 1/2 cup semi-sweet chocolate chips
- 1/4 cup unsalted butter
- 1/4 cup sugar
- 1 large egg
- 1 egg yolk
- 1/4 tsp vanilla extract
- 2 tbsp all-purpose flour
- Pinch of salt
- Cocoa powder (for dusting)
- Optional: extra ganache for topping
Instructions
- Melt the chocolate and butter in 30-second intervals, stirring until smooth.
- Whisk in sugar, then add the egg, egg yolk, and vanilla. Mix until glossy.
- Gently fold in the flour and salt until just combined.
- Grease a ramekin or mug, pour in batter, and bake at 375°F (190°C) for 10–12 minutes.
- Serve hot, dusted with cocoa powder or drizzled with ganache.
Notes
- For best results, do not overbake—the center should remain soft.
- Use high-quality chocolate for richer flavor.
- Prep Time: 10 minutes
- Cook Time: 12 minutes
- Category: Dessert
- Method: Baking
- Cuisine: American
Nutrition
- Serving Size: 1 cake
- Calories: 430
- Sugar: 30g
- Sodium: 50mg
- Fat: 25g
- Saturated Fat: 15g
- Unsaturated Fat: 8g
- Trans Fat: 0g
- Carbohydrates: 45g
- Fiber: 2g
- Protein: 6g
- Cholesterol: 180mg