
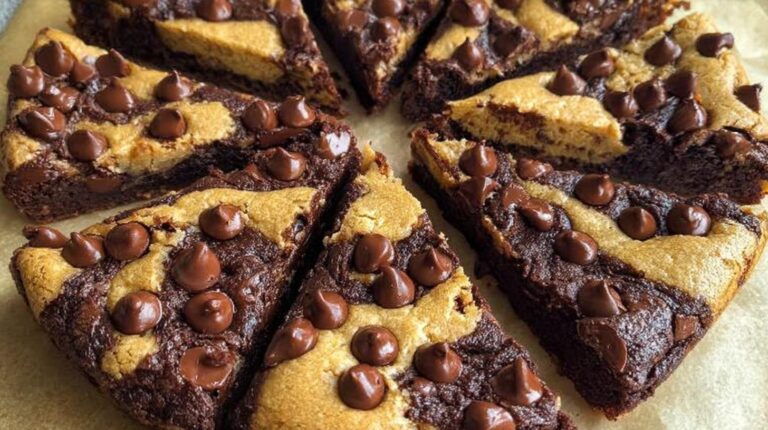
Oh my goodness, let me tell you about my latest baking obsession – these incredible brownie cookie bars that disappeared faster than I could say “seconds please!” at our last family potluck. Imagine the fudgiest brownie you’ve ever had meeting a soft-baked chocolate chip cookie, then deciding to live together in perfect harmony. That’s exactly what you get here.
I first made these when my niece begged for “something chocolatey” for her birthday, and now they’re my go-to dessert for every gathering. The magic happens when the rich brownie base bakes up dense and fudgy while the cookie dough topping stays slightly soft and chewy. One bite and you’ll understand why my family calls these “dangerous” – they’re impossible to resist when still warm from the oven with melty chocolate chips!
The best part? They come together with simple ingredients you probably already have in your pantry. No fancy techniques here – just pure, gooey chocolate bliss that’ll make you the hero of any dessert table.
Why You’ll Love These Brownie Cookie Bars
Let me count the ways these beauties will steal your heart (and your dessert plate):
- Two treats in one – Why choose between brownies and cookies when you can have both in every glorious bite?
- Foolproof baking – No fancy skills needed, just simple mixing and layering for guaranteed delicious results
- That perfect texture – Crisp edges with a gooey center that makes everyone reach for seconds
- Instant crowd-pleaser – I’ve yet to meet anyone who can resist these warm from the oven!
Seriously, these bars disappear faster than cookies at a bake sale – consider yourself warned!
Ingredients for Brownie Cookie Bars
Okay, let’s talk ingredients – and I mean the right ingredients. Trust me, I’ve learned the hard way that using the wrong butter temperature or skimping on chocolate chips makes all the difference here. These measurements are my tried-and-true perfect balance between brownie and cookie layers.
Brownie Layer Ingredients
For that fudgy, chocolatey base that makes these bars special:
- 1/2 cup (1 stick) unsalted butter, melted – Yes, melted! This gives the brownie layer its dense, rich texture. I zap mine in the microwave in 15-second bursts until just liquid.
- 1 cup granulated sugar – Plain white sugar lets the chocolate flavor shine.
- 2 large eggs – Room temperature eggs blend better (just leave them out for 30 minutes first).
- 1 tsp vanilla extract – The good stuff, please! None of that imitation vanilla.
- 1/3 cup unsweetened cocoa powder – I use Dutch-processed for extra richness, but regular works too.
- 1/2 cup all-purpose flour – Spoon and level it – don’t scoop!
- 1/4 tsp salt – Just enough to balance the sweetness.
Cookie Dough Topping Ingredients
Now for the cookie part that makes these bars irresistible:
- 1/2 cup (1 stick) unsalted butter, softened – Softened, not melted! It should leave a slight indent when pressed.
- 1/2 cup light brown sugar, packed – Pack it firmly into your measuring cup for that molasses flavor.
- 1/4 cup granulated sugar – The combo of sugars makes the perfect chew.
- 1 large egg – Again, room temp is key for smooth mixing.
- 1 tsp vanilla extract – Yes, more vanilla! It enhances all the chocolate.
- 1 1/4 cups all-purpose flour – Measured carefully to avoid dry dough.
- 1/2 tsp baking soda – Not powder! This helps the cookie layer rise slightly.
- 1/2 tsp salt – Balances all that sweetness beautifully.
- 3/4 cup semi-sweet chocolate chips (plus extra for topping) – I always add extra chips on top because… well, why not?
See? Nothing fancy – just quality ingredients treated right. Now let’s make some magic!
Equipment You’ll Need
Here’s the beautiful part – you don’t need any fancy gadgets to make these brownie cookie bars shine! Just grab these trusty kitchen staples (you probably have most already):
- 9-inch round cake pan or pie dish – My grandma’s old metal pan works perfectly, but glass is fine too. If you’re worried about sticking, go ahead and line the bottom with parchment paper – it’s my little insurance policy!
- 2 mixing bowls – One for the brownie batter, one for the cookie dough. Medium size works great – no need to break out the giant salad bowl.
- Whisk – For getting that brownie batter nice and smooth. A fork works in a pinch, but I love my trusty balloon whisk for this.
- Rubber spatula – Essential for scraping every last bit of batter into the pan (and maybe licking the bowl later…).
- Measuring cups and spoons – Because eyeballing measurements leads to sad, flat brownies. Trust me on this one.
- Oven mitts – That pan gets hot! I may or may not have learned this the hard way…
That’s it! No stand mixer required (though you can use one if you want). Just simple tools for simple, delicious baking. Now let’s get to the fun part!
How to Make Brownie Cookie Bars
Alright, let’s get baking! I promise these brownie cookie bars are easier to make than they look. Just follow these simple steps, and you’ll have a pan of chocolatey perfection in no time. Don’t worry – I’ve included all my little tricks to make sure yours turn out just right!
Preparing the Brownie Layer
First things first – preheat that oven to 350°F. While it’s heating up, let’s make the brownie base that’ll make these bars so special:
- Grab your melted butter (I like to microwave mine in a microwave-safe bowl for about 45 seconds) and whisk it together with the granulated sugar until it looks like shiny, wet sand.
- Crack in those room-temperature eggs one at a time, whisking well after each one. This is when the magic starts – the mixture will turn thick and glossy, almost like pancake batter.
- Stir in the vanilla extract – give it a good sniff because that aroma is heavenly!
- Now gently fold in the cocoa powder, flour, and salt. Here’s my secret: stop mixing as soon as you don’t see any dry streaks. Overmixing makes tough brownies, and we want these fudgy!
- Pour the batter into your prepared pan and spread it evenly with a spatula. It’ll be thick – that’s perfect!
Making the Cookie Dough Topping
While your brownie layer waits patiently, let’s whip up that dreamy cookie dough topping:
- In your second bowl, cream together the softened butter and both sugars until light and fluffy. I use a wooden spoon and some elbow grease – about 2 minutes of vigorous mixing does the trick!
- Beat in the egg and vanilla until everything is well combined. The mixture might look a bit curdled at first – don’t panic! Just keep mixing.
- Add the flour, baking soda, and salt all at once. Stir just until the dry ingredients disappear – no need to overdo it.
- Now the best part – fold in those chocolate chips! I usually add an extra handful because… well, chocolate.
- Drop spoonfuls of cookie dough all over the brownie batter. Then use clean fingers or the back of a spoon to gently press and swirl the dough into the brownie layer just a bit. Don’t mix them completely – we want distinct layers with some marbling!
Baking and Cooling Tips
Now for the hardest part – waiting while these beauties bake!
- Pop your pan into the preheated oven and set a timer for 25 minutes. Resist the urge to open the oven door – we want that heat to stay steady!
- At 25 minutes, do the toothpick test: stick it near the center. You want to see some moist crumbs clinging to it, but no raw batter. If it’s too wet, give it another 3-5 minutes.
- When done, the edges will be set and slightly puffed, while the center will still look a bit soft – that’s exactly what we want for that gooey texture!
- Let the pan cool on a wire rack for at least 20 minutes before slicing. I know it’s tempting to dive right in, but trust me – this waiting time helps the layers set so you get clean slices.
- For extra decadence, sprinkle a few extra chocolate chips on top right when it comes out of the oven – they’ll melt slightly into the surface. Divine!
See? Simple steps for maximum deliciousness. Now let’s talk about how to make these bars absolutely perfect every time…
Tips for Perfect Brownie Cookie Bars
After making these brownie cookie bars more times than I can count (okay fine, I’ve lost track because I keep eating them!), I’ve learned a few secrets that guarantee bakery-worthy results every single time. These aren’t just random tips – they’re my hard-earned lessons from many happy (and a few not-so-perfect) batches!
Temperature matters more than you think
I used to wonder why my cookie layer sometimes turned out dense while the brownie stayed gooey. The answer? Room temperature ingredients! Cold eggs and butter don’t incorporate properly into batters. Now I take my eggs and butter out about 30 minutes before baking – just enough to take the chill off. The difference is incredible!
The toothpick test – but smarter
Here’s my golden rule: pull the bars out when the toothpick has moist crumbs, not clean and not wet batter. The edges should look set while the center still jiggles slightly. They’ll continue cooking as they cool, so pulling them a tad early prevents overbaking. I’ve burned one batch by waiting too long – never again!
Patience is a virtue (especially with cooling)
I know, I know – waiting is torture when your kitchen smells like chocolate heaven. But cutting into warm bars makes a gooey mess (delicious, but messy!). Let them cool at least 20 minutes – the layers firm up beautifully. Pro tip: run a knife around the edges after 10 minutes to prevent sticking.
The chocolate chip trick
Want that picture-perfect melty chocolate look? Reserve a handful of chips to press onto the top right after baking. The residual heat makes them glossy and irresistible. My niece calls this “the jewelry” on our bars!
Follow these simple tips, and you’ll have brownie cookie bars that look as amazing as they taste. Now who’s ready to bake?
Variations of Brownie Cookie Bars
Now that you’ve mastered the basic recipe, let’s talk about how to make these brownie cookie bars your own! One of my favorite things about this recipe is how easily you can tweak it to suit different tastes or whatever ingredients you have on hand. Here are some of my favorite twists that always get rave reviews:
Chocolate lovers’ dream
For serious chocolate fans (you know who you are!), try these easy upgrades:
- Dark chocolate chips – Swap semi-sweet for 70% dark chocolate chips for a richer, more sophisticated flavor. My husband prefers this version!
- Double chocolate – Add 1/4 cup cocoa powder to the cookie dough layer for an extra chocolate punch.
- Chocolate chunks – Roughly chop a chocolate bar instead of using chips for melty pockets of chocolate in every bite.
Nutty variations
If you’re a fan of texture (and aren’t allergic!), nuts add wonderful crunch:
- Walnut wonder – Fold 1/2 cup chopped walnuts into the brownie batter – just like classic walnut brownies!
- Pecan delight – Toast pecans first, then sprinkle over the top before baking for a caramelized crunch.
- Almond joy – Add 1/4 cup sliced almonds to the cookie dough and top with flaked coconut for a tropical twist.
Fun mix-in ideas
Get creative with these playful additions:
- Peanut butter cups – Press mini peanut butter cups into the top before baking – they melt into gooey pockets of joy!
- Mint chocolate – Add 1/4 tsp peppermint extract to the cookie dough and use mint chocolate chips.
- Salted caramel – Drizzle caramel sauce over the baked bars and sprinkle with sea salt – sweet and salty perfection!
The possibilities are endless! Once you’re comfortable with the basic recipe, don’t be afraid to experiment. Some of my best creations came from “what if I try…” moments in the kitchen. Just remember – no matter which variation you choose, you’re still getting that magical combination of brownie and cookie in every bite!
Serving and Storing Brownie Cookie Bars
Okay, let’s talk about the best part – eating these beauties! I’ve learned a few tricks over the years for serving and storing that keep these brownie cookie bars tasting fresh and fabulous. Because let’s be honest – they rarely last more than a day in my house, but just in case…
Serving suggestions that’ll wow your guests
For maximum enjoyment, serve these bars slightly warm – the chocolate chips will be gloriously melty! I usually cut them into wedges right in the pan (a pizza cutter works wonders for clean slices). Here are my favorite ways to serve them:
- À la mode – Top with vanilla ice cream and watch it melt into the warm chocolate layers. Pure heaven!
- Drizzle magic – A zigzag of caramel or chocolate sauce takes these from homemade to bakery-worthy.
- Coffee break – These pair perfectly with a cup of strong coffee – the bitterness balances the sweetness.
Storing leftovers (if you have any!)
If by some miracle you have leftovers (it happens!), here’s how to keep them fresh:
- Room temperature – Keep in an airtight container at room temp for up to 3 days. I like to place parchment between layers if stacking.
- Refrigerator – For longer storage, refrigerate up to 5 days. Let come to room temp or microwave briefly before serving.
- Freezer – These freeze beautifully! Wrap individual bars tightly in plastic wrap, then foil. Freeze up to 3 months. Thaw overnight in fridge or microwave 30 seconds.
Reheating tricks
Want that fresh-from-the-oven experience days later? Here’s how:
- Microwave – 10-15 seconds brings back that warm, gooey texture.
- Oven – Wrap in foil and warm at 300°F for 5-8 minutes – perfect for reviving multiple servings.
- Air fryer – My new favorite! 2-3 minutes at 320°F makes them taste freshly baked.
No matter how you serve or store them, these brownie cookie bars stay delicious. Just try not to eat them all in one sitting – though I won’t judge if you do!
Nutritional Information for Brownie Cookie Bars
Now, let’s be real – we’re not eating these brownie cookie bars because they’re a health food! But I know some folks like to keep track, so here’s the scoop on what’s in each delicious slice. Remember, these numbers are estimates – your actual counts might vary depending on exact ingredients and serving sizes.
Per serving (about 1/8th of the pan – though let’s be honest, I usually eat bigger slices!):
- Calories: Around 480 – consider it fuel for happiness!
- Sugar: 40g (mostly from the chocolate chips and brown sugar – worth every sweet bite)
- Fat: 25g (that rich butter and chocolate goodness)
- Carbohydrates: 60g (perfect for that afternoon energy slump)
- Protein: 6g (from the eggs – see, there’s some nutrition here!)
A little disclaimer from my kitchen to yours: I’m a baker, not a nutritionist! These numbers come from averaging a few recipe calculators. If you need precise counts for dietary reasons, I’d recommend plugging your exact ingredients into your favorite nutrition app. But honestly? Sometimes you just need to enjoy life’s sweet moments – and these bars are definitely one of them!
FAQs About Brownie Cookie Bars
I’ve gotten so many questions about these brownie cookie bars over the years – everyone wants to know how to make them just right! Here are the answers to the most common ones that pop up in my kitchen (and my DMs!). Consider this your cheat sheet for brookie success.
Can I Use a Different Pan?
Absolutely! While I love my trusty 9-inch round pan for that “brownie pizza” look, you’ve got options:
- Square pans – An 8×8 works great, just bake a few minutes longer since it’s deeper.
- Muffin tins – Make individual brookie cups! Fill liners halfway and bake 18-20 minutes.
- Sheet pan – Spread thinner on a quarter sheet pan (9×13) for more servings – reduce bake time to 20 minutes.
The key is watching for that perfect doneness – edges set, center slightly soft. Adjust times accordingly!
How Do I Store Leftovers?
Ha! “Leftovers” – that’s funny in my house. But when we miraculously have some:
- Room temp – Keep in an airtight container for 2-3 days (if they last that long!).
- Fridge – They’ll stay fresh up to 5 days – just microwave for 10 seconds to revive that gooey texture.
- Pro tip – Place parchment between layers if stacking to prevent sticking.
Honestly though? They’re best fresh – which is why I usually “accidentally” leave them out on the counter where everyone can grab seconds!
Can I Freeze These Bars?
You bet! These freeze like a dream – perfect for when you need a chocolate emergency stash (we all have those days). Here’s how:
- Individual portions – Wrap each bar tightly in plastic wrap, then foil. They’ll keep for 3 months.
- Thawing – Overnight in fridge or 30 seconds in microwave from frozen.
- Baked vs unbaked – You can freeze the unbaked pan too! Just thaw overnight before baking as usual.
My freezer always has a batch ready for unexpected guests (or… you know… midnight cravings). The cookie dough layer stays perfectly chewy after thawing!
Ready to Bake?
Alright, my fellow baking enthusiast – you’ve got all the secrets now! I can practically smell that rich chocolate aroma already. What are you waiting for? Grab those mixing bowls and let’s make some magic happen in your kitchen today!
I’d love to hear how your brownie cookie bars turn out. Did you stick with the classic version or try one of the fun variations? Maybe you discovered a brilliant new twist of your own? Snap a photo and tag me – there’s nothing I love more than seeing your delicious creations!
One last piece of advice from someone who’s made these more times than I can count: bake an extra batch to share. Trust me, these bars make friends fast – just ask my neighbors who suddenly started “dropping by” more often after I started baking them regularly!
Now go preheat that oven – your perfect brownie cookie bars are waiting to happen. Happy baking!
Print
Irresistible 2-Layer Brownie Cookie Bars Recipe You Need Now
- Total Time: 45 minutes
- Yield: 8 servings 1x
- Diet: Vegetarian
Description
A delicious dessert combining brownie and cookie dough layers into a gooey chocolate treat.
Ingredients
- Brownie Layer:
- 1/2 cup (1 stick) unsalted butter, melted
- 1 cup granulated sugar
- 2 large eggs
- 1 tsp vanilla extract
- 1/3 cup unsweetened cocoa powder
- 1/2 cup all-purpose flour
- 1/4 tsp salt
- Cookie Dough Topping:
- 1/2 cup (1 stick) unsalted butter, softened
- 1/2 cup light brown sugar, packed
- 1/4 cup granulated sugar
- 1 large egg
- 1 tsp vanilla extract
- 1 1/4 cups all-purpose flour
- 1/2 tsp baking soda
- 1/2 tsp salt
- 3/4 cup semi-sweet chocolate chips (plus extra for topping)
Instructions
- Preheat oven to 350°F. Grease a 9-inch round cake pan or pie dish and line the bottom with parchment if you can.
- Make the brownie batter: Whisk melted butter and sugar. Add eggs and vanilla and whisk until glossy. Stir in cocoa, flour, and salt just until combined. Spread brownie batter evenly in the pan.
- Make the cookie dough: Cream softened butter with brown sugar and granulated sugar. Mix in egg and vanilla. Add flour, baking soda, and salt; mix until combined. Stir in chocolate chips.
- Drop spoonfuls of cookie dough over the brownie layer. Lightly press down and swirl a bit (don’t fully mix). Sprinkle extra chocolate chips over the top.
- Bake 25–30 minutes, until edges are set and the center is just slightly soft (a toothpick should come out with moist crumbs, not raw batter).
- Cool at least 20 minutes for clean slices, then cut into wedges and serve gooey-warm.
Notes
- Use room temperature ingredients for best results.
- Do not overmix the brownie batter.
- Let cool slightly before slicing for cleaner edges.
- Prep Time: 15 minutes
- Cook Time: 30 minutes
- Category: Dessert
- Method: Baking
- Cuisine: American
Nutrition
- Serving Size: 1 slice
- Calories: 480
- Sugar: 40g
- Sodium: 200mg
- Fat: 25g
- Saturated Fat: 15g
- Unsaturated Fat: 8g
- Trans Fat: 0g
- Carbohydrates: 60g
- Fiber: 3g
- Protein: 6g
- Cholesterol: 100mg