
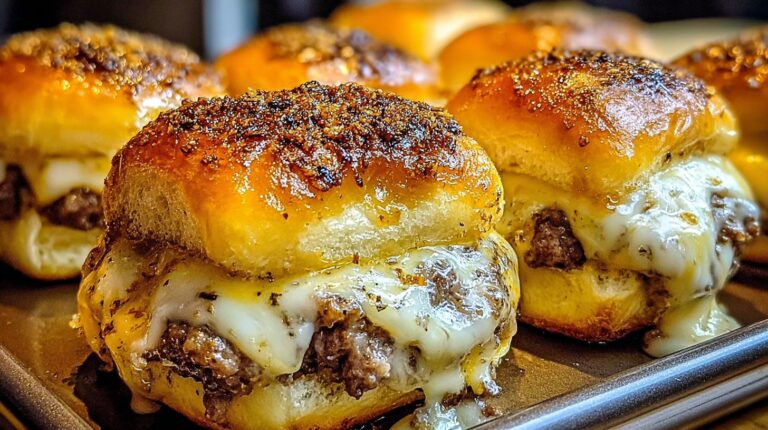
Oh my goodness, you have got to try these cheeseburger sliders! I first made them for my husband’s football gathering last season, and let me tell you – they disappeared faster than you can say “touchdown!” There’s something magical about those sweet Hawaiian rolls hugging juicy beef, melty cheese, and that garlic butter glaze. These little guys are my secret weapon for any party or game day spread – minimal effort, maximum flavor. Whether you’re feeding hungry teens or impressing your book club, this recipe never fails. Just wait until you see everyone’s faces light up when you pull these golden, cheesy beauties out of the oven!
Why You’ll Love These Cheeseburger Sliders
Trust me, these sliders will become your go-to party lifesaver. Here’s why:
- Crazy quick prep: From fridge to table in under 30 minutes – perfect when guests show up unexpectedly!
- Flavor bombs: That garlic butter soak transforms humble ingredients into something extraordinary.
- Customizable: Swap cheeses, add bacon, or go spicy with jalapeños – make ’em your own!
- Crowd-pleaser: Kids devour them, adults rave about them. One batch always leads to “Can you make more?”
- No-fuss cleanup: One pan, minimal dishes. (My kinda cooking!)
Seriously, the first time I made these, my neighbor asked for the recipe before she even finished chewing!
Ingredients for Cheeseburger Sliders
Here’s what you’ll need to make these irresistible sliders – and yes, every single ingredient matters! I learned the hard way that skimping on quality makes a big difference in the final flavor.
- 1 lb ground beef (80/20 recommended): That 20% fat keeps them juicy – lean beef makes dry sliders!
- 1 small onion, finely diced: Trust me, take the extra minute to chop it small so you don’t get big onion chunks.
- Seasoning squad: 1 tsp garlic powder, 1 tsp salt, 1/2 tsp black pepper – simple but mighty.
- 1 tbsp Worcestershire sauce: My secret umami booster – don’t skip it!
- 12 Hawaiian sweet rolls: Keep them connected as one slab – their sweetness balances the savory perfectly.
- 8 slices provolone or Swiss cheese: Or go wild with 2 cups shredded mozzarella/provolone blend.
- 2 tbsp mayonnaise (optional): Spread on the bottom buns to create a moisture barrier – game changer!
- Garlic butter magic: 4 tbsp melted butter + 1 tsp Italian seasoning + 1/2 tsp garlic powder + 2 tbsp Parmesan + optional red pepper flakes/flaky salt for sparkle.
See? Nothing fancy, just good ingredients treated right. Now let’s make some magic!
How to Make Cheeseburger Sliders
Okay, let’s get these beauties in the oven! I promise it’s easier than you think – just follow these simple steps for slider perfection. The key is taking your time with each layer to build maximum flavor. You’ll be amazed how such simple techniques create something so ridiculously tasty!
Step 1: Cook the Beef Mixture
First, grab your favorite skillet (I always use my well-seasoned cast iron) and crank it to medium heat. Toss in that ground beef and diced onion together – the onions will caramelize while the beef browns, creating amazing depth of flavor. Break up the beef as it cooks until it’s nice and crumbly, about 5-6 minutes.
Here’s my pro tip: tilt the pan and use a spoon to drain off most of the excess grease (but don’t go crazy – that little bit left keeps things moist!). Now for the flavor boosters – sprinkle in the garlic powder, salt, pepper, and that magical Worcestershire sauce. Give it a good stir and let it cook just one more minute. Your kitchen should smell incredible right now!
Step 2: Assemble the Sliders
While your beef cools slightly (hot beef makes the buns soggy!), grab those Hawaiian rolls. Keep them connected as one big slab and slice horizontally – I use a serrated bread knife for clean cuts. Place the bottom halves in your prepared baking dish. Here’s where that optional mayo comes in – if you’re using it, spread a thin layer over the buns. It creates a moisture barrier that keeps the bottom from getting soggy!
Now the fun part – layering! First, arrange half your cheese slices over the buns (or sprinkle half the shredded cheese). Spoon the beef mixture evenly across, pressing lightly. Top with remaining cheese – because double cheese is always better! Gently place the top buns over your cheesy masterpiece.
Step 3: Bake and Finish
Time for the pièce de résistance – that garlic butter glaze! Mix melted butter with Italian seasoning and garlic powder, then grab a pastry brush (or use a spoon in a pinch). Generously brush this golden goodness over every inch of the top buns. Sprinkle with Parmesan and those optional red pepper flakes if you like a little kick.
Cover loosely with foil (prevents over-browning) and bake at 350°F for 10 minutes. Then remove the foil and bake another 8-10 minutes until the tops are gorgeously golden and the cheese is bubbling. For extra crispiness, I sometimes broil for just 1-2 minutes at the end – watch closely though!
Finally – the hardest part – let them rest 5 minutes before slicing. This lets the cheese set so you get clean cuts. Then dig in to the most irresistible, garlicky, cheesy sliders you’ve ever tasted!
Tips for Perfect Cheeseburger Sliders
After making these sliders countless times (and learning from a few disasters!), here are my can’t-miss tips:
- Hawaiian rolls are non-negotiable: Their sweetness balances the savory filling perfectly – but if you must substitute, brioche works in a pinch.
- Broil for the last 2 minutes: That extra blast of heat gives you an irresistible golden crust (just don’t walk away!).
- Rest before slicing: I know it’s hard to wait, but those 5 minutes let the cheese set so you don’t get a cheesy landslide.
- Drain beef well: Too much grease = soggy bottoms. I tilt the pan and spoon it out like a madwoman!
- Mayo barrier trick: A thin layer on the bottom buns keeps them from getting soggy overnight (if they last that long!).
Follow these and you’ll be the slider hero at every gathering!
Variations for Cheeseburger Sliders
The beauty of these sliders? You can dress ’em up a hundred different ways! Here are my favorite twists:
- Bacon lovers: Crumble cooked bacon into the beef mixture or layer crispy strips under the cheese.
- Pickle power: Add dill pickle slices before topping with the buns – that tang cuts through the richness perfectly.
- Spicy kick: Mix diced jalapeños into the beef or sprinkle with crushed red pepper flakes before baking.
- BBQ vibes: Swap Worcestershire for BBQ sauce and use cheddar cheese – instant crowd-pleaser!
Honestly? I’ve never met a variation that didn’t disappear fast!
Serving Suggestions for Cheeseburger Sliders
Oh, let me tell you how I love to serve these sliders – they’re perfect with crispy fries for that classic diner vibe, or go fresh with a tangy coleslaw. For game days, I pile them next to spicy buffalo wings and cold beers. Sometimes I even do a build-your-own slider bar with extra pickles, onions, and sauces – it’s always a hit!
Storing and Reheating Cheeseburger Sliders
Here’s my foolproof method for keeping leftover sliders delicious (though let’s be real – leftovers are rare in my house!). Store them in an airtight container in the fridge for up to 3 days. To reheat, I always use the oven at 350°F for about 10 minutes – it keeps that garlic butter topping crisp. The microwave works in a pinch (20-30 seconds), but the rolls can get a bit soft. Pro tip: If you know you’ll have leftovers, underbake them slightly the first time – they’ll be perfect after reheating!
Nutritional Information for Cheeseburger Sliders
Okay, let’s talk numbers (but don’t let them scare you – these are totally worth it!). Each slider comes in at about 410 calories, with 20g protein and 28g carbs. Keep in mind these are estimates – your exact counts will vary based on cheese choices and how much of that garlic butter soaks in (I never skimp!). Everything in moderation, right? Now go enjoy your delicious creation!
FAQs About Cheeseburger Sliders
I get questions about these sliders all the time – here are the answers to the ones that pop up most!
Can I Use Different Cheese?
Absolutely! While provolone and Swiss are my go-tos, cheddar gives that classic burger vibe, and mozzarella makes an epic cheese pull. Blue cheese crumbles add a fun twist too. Just avoid super dry cheeses like Parmesan as the main layer – they won’t melt as beautifully. My rule? Any cheese that makes you happy on a regular burger will shine here!
Can I Prepare These Ahead?
You bet! Assemble everything up to the butter brushing step, cover tightly with plastic wrap, and refrigerate for up to 24 hours. When ready, let them sit at room temp for 30 minutes before adding the garlic butter and baking. I’ve done this for countless parties – it’s a total lifesaver!
How Do I Prevent Soggy Sliders?
Three words: drain, mayo, rest! First, drain that beef really well (I tilt the pan and spoon out every last drop of grease). Second, that thin mayo layer on the bottom buns creates a waterproof barrier. Finally, letting them rest 5 minutes after baking allows excess moisture to redistribute. Follow these steps and you’ll get perfect texture every single time!
Share Your Cheeseburger Sliders Experience
I’d love to hear how your sliders turned out! Leave a comment below or tag me on social media – nothing makes me happier than seeing your cheesy creations!
Print
Irresistible Cheeseburger Sliders That Disappear in 30 Minutes
- Total Time: 30 minutes
- Yield: 12 sliders 1x
- Diet: Low Lactose
Description
Cheesy Garlic Butter Cheeseburger Sliders made with ground beef, onions, and melted cheese on Hawaiian rolls, brushed with garlic butter for a flavorful party or game day snack.
Ingredients
- 1 lb ground beef (80/20 recommended)
- 1 small onion, finely diced
- 1 tsp garlic powder
- 1 tsp salt
- 1/2 tsp black pepper
- 1 tbsp Worcestershire sauce
- 12 Hawaiian sweet rolls (or slider buns), kept as one slab if possible
- 8 slices provolone or Swiss cheese (or 2 cups shredded mozzarella/provolone blend)
- 2 tbsp mayonnaise (optional, for the bottom buns)
- 4 tbsp unsalted butter, melted
- 1 tsp Italian seasoning
- 1/2 tsp garlic powder
- 2 tbsp grated Parmesan
- 1/2 tsp crushed red pepper flakes (optional)
- 1/2 tsp flaky salt (optional)
Instructions
- Preheat oven to 350°F. Lightly grease a 9×13-inch baking dish.
- In a skillet over medium heat, cook ground beef and diced onion until browned. Drain excess grease.
- Stir in garlic powder, salt, pepper, and Worcestershire sauce. Cook 1 more minute, then remove from heat.
- Slice the rolls horizontally (keep tops and bottoms together). Place the bottom slab in the baking dish. (Optional: spread mayo on the bottom buns.)
- Layer half the cheese over the bottom buns, spread the beef mixture evenly, then add the remaining cheese. Place the top buns on.
- Mix melted butter with Italian seasoning and garlic powder. Brush generously over the tops. Sprinkle Parmesan (and red pepper flakes/flaky salt if using).
- Cover loosely with foil and bake 10 minutes. Uncover and bake 8–10 minutes more, until the tops are deeply golden and the cheese is fully melted.
- Rest 5 minutes, slice into sliders, and serve warm.
Notes
- Use Hawaiian rolls for a slightly sweet flavor.
- For extra crispiness, broil for 1–2 minutes after baking.
- Customize with pickles, bacon, or jalapeños.
- Prep Time: 10 minutes
- Cook Time: 20 minutes
- Category: Appetizer
- Method: Baking
- Cuisine: American
Nutrition
- Serving Size: 1 slider
- Calories: 410
- Sugar: 5g
- Sodium: 620mg
- Fat: 24g
- Saturated Fat: 12g
- Unsaturated Fat: 9g
- Trans Fat: 1g
- Carbohydrates: 28g
- Fiber: 1g
- Protein: 20g
- Cholesterol: 80mg