
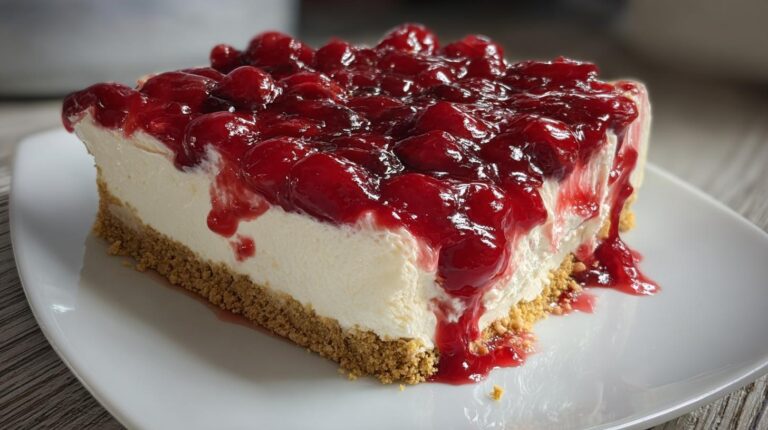
There’s something magical about no-bake desserts, isn’t there? When I first made this No-Bake Cherry Cheesecake years ago for my niece’s birthday, I couldn’t believe how something so simple could disappear so fast from the dessert table! It’s become our family’s go-to summer treat when we want something cool, creamy, and bursting with that sweet-tart cherry flavor without turning on the oven. The graham cracker crust gives that perfect crunch against the velvety filling, and that ruby-red cherry topping? Absolute showstopper. What I love most is how it lets you be the dessert hero with minimal fuss – just mix, chill, and wow everyone!
Why You’ll Love This No-Bake Cherry Cheesecake
Trust me, this recipe will become your new dessert secret weapon because:
- No oven needed – Perfect for hot summer days or when you just can’t deal with baking
- Ready in 15 minutes (plus chilling) – Faster than driving to the bakery!
- Creamy dreamy texture – That whipped topping folded into the cream cheese? Absolute magic
- Total crowd-pleaser – Kids go crazy for the cherry topping, adults adore the classic cheesecake flavor
- Foolproof – Even if you’ve never made cheesecake before, you can’t mess this up
Seriously, I’ve made this for everything from barbecues to book club, and there’s never a crumb left!
Ingredients for No-Bake Cherry Cheesecake
Grab these simple ingredients – most are probably in your kitchen already! I always measure everything before starting (my grandma’s “mise en place” habit that saves so much stress). Pro tip: Let the cream cheese sit out for 30 minutes – cold cream cheese makes lumpy filling, and nobody wants that!
- 2 cups graham cracker crumbs (about 15 full sheets crushed – I whiz mine in a food processor, but a ziplock bag + rolling pin works too!)
- ½ cup melted butter (1 stick – use unsalted so you control the saltiness)
- 2 (8 oz) packages cream cheese, softened (full-fat please – this isn’t the time for diet versions)
- 1 cup powdered sugar (sift it if lumpy – trust me, your arms will thank you later)
- 1 teaspoon vanilla extract (the real stuff, not imitation – it makes all the difference)
- 1 (8 oz) container whipped topping, thawed (Cool Whip works great, but homemade whipped cream is heavenly if you’re feeling fancy)
- 1 (21 oz) can cherry pie filling (the star of the show! Look for ones with plump cherries)
See? Nothing weird or hard-to-find. The beauty of this recipe is how pantry-friendly it is. I sometimes keep extra pie filling on hand because my kids beg to make this every weekend!
Equipment You’ll Need
Good news – you probably already own everything needed! Here’s my trusty toolkit:
- 9×9-inch baking dish (my favorite is glass so I can see those pretty layers)
- Mixing bowls (one medium for crust, one large for filling)
- Hand mixer or stand mixer (though a strong arm and whisk work in a pinch)
- Spatula (for scraping every bit of that creamy filling)
- Measuring cups/spoons (grandma always said “baking is science!”)
That’s it! No fancy gadgets required – just basic kitchen essentials.
How to Make No-Bake Cherry Cheesecake
Okay, let’s get to the fun part! This recipe comes together in three simple steps – I promise it’s easier than you think. The key is taking your time with each layer. My first attempt years ago was a bit messy (who knew crusts could crumble so easily?), but now I’ve got this down to a science!
Step 1: Prepare the Graham Cracker Crust
First, grab your baking dish and let’s make that irresistible crunchy base. In a medium bowl, mix the graham cracker crumbs and melted butter until it looks like wet sand. You’ll know it’s right when you can squeeze a handful and it holds its shape.
Now, dump the mixture into your baking dish and press it firmly with your fingers or the back of a measuring cup. Get those edges nice and tight – this prevents crumbling later! I like to press from the center outward in circular motions for even thickness. Pop this in the fridge while you make the filling – it helps the crust set.
Step 2: Make the Cheesecake Filling
Here’s where the magic happens! In your large mixing bowl, beat the softened cream cheese until it’s completely smooth – no lumps allowed! This takes about 2 minutes with a hand mixer. Scrape down the sides halfway through – those sneaky lumps love to hide there.
Add the powdered sugar and vanilla, then beat again until silky. Now, gently fold in the whipped topping with a spatula. Don’t overmix! Just fold until no white streaks remain. The filling should be light and fluffy – like cheesecake clouds! Taste a spoonful (chef’s privilege) and marvel at your genius.
Step 3: Assemble and Chill
Time to bring it all together! Pull your crust from the fridge and spread the filling evenly over the top. I use an offset spatula for this, but the back of a spoon works too. Smooth it right to the edges – we want perfect layers.
Now, the grand finale – spoon that gorgeous cherry pie filling over the cheesecake layer. I like to leave about a ½-inch border so you can see the white filling peeking through. Refrigerate for at least 2 hours (4 is better if you can wait). This sets everything perfectly. Pro tip: Cover loosely with plastic wrap so your fridge smells don’t sneak in!
When it’s time to serve, run a knife around the edges and slice into squares. Watch everyone’s eyes light up when they see those beautiful layers! The hardest part? Not eating it straight from the pan with a spoon.
Tips for the Perfect No-Bake Cherry Cheesecake
After making this dozens of times (okay, maybe hundreds), here are my foolproof secrets:
- Room temp is key – Let cream cheese soften fully (about 30 minutes out of the fridge) to avoid lumpy filling
- Press, don’t pat – Really pack that crust down hard – it should feel like wet beach sand
- Chill time matters – Don’t rush the 2-hour minimum chill – the filling needs time to set properly
- Drain cherries slightly – If your pie filling seems extra juicy, let it drain a bit so it doesn’t make the top soggy
Follow these, and you’ll get rave reviews every time!
Ingredient Substitutions and Variations
This recipe is wonderfully flexible – I’ve tried all sorts of twists over the years! For a gluten-free version, use gluten-free graham crackers (they work just as well). Out of cherries? Any pie filling shines – my kids love strawberry, while blueberry feels extra fancy. You can even swap the whipped topping for equal parts homemade whipped cream if you prefer (just beat heavy cream with a bit of powdered sugar until stiff peaks form). The one thing I wouldn’t change? That full-fat cream cheese – low-fat versions make the filling weep. Oh, and crushed Oreos instead of graham crackers? Absolute game changer for chocolate lovers!
Serving and Storing No-Bake Cherry Cheesecake
This cheesecake is best served chilled straight from the fridge – I like to let it sit just 5 minutes at room temperature so the flavors really pop. For extra flair, add a dollop of whipped cream and fresh mint leaves. Store leftovers (if you’re lucky enough to have any!) covered in the fridge for up to 3 days. Freezing isn’t recommended – the texture gets icy and the crust soggy. Pro tip: Cut slices with a warm knife for picture-perfect edges every time!
Nutritional Information
Just a heads up – these numbers are estimates since brands vary, but here’s the scoop per serving: about 410 calories, 25g fat (15g saturated), and 30g sugar. It’s got 6g protein and 1g fiber too. Not exactly health food, but totally worth every creamy, cherry-filled bite in my book!
Frequently Asked Questions
Can I Make This Cheesecake Ahead of Time?
Absolutely! In fact, I often make it the night before – the flavors meld beautifully after 24 hours in the fridge. Just hold off on adding the cherry topping until about an hour before serving to keep that gorgeous ruby color vibrant. Cover tightly with plastic wrap so it doesn’t pick up any fridge odors.
What Can I Use Instead of Cherry Pie Filling?
The possibilities are endless! Blueberry pie filling gives it a gorgeous purple hue, while strawberry makes it extra summery. For a decadent twist, try chocolate sauce or caramel drizzle. Fresh fruit works too – just macerate sliced strawberries with a bit of sugar first. My friend swears by lemon curd for a tart surprise!
Why Is My Cheesecake Filling Lumpy?
Ah, the dreaded lumps! This happens when the cream cheese isn’t soft enough before mixing. Let it sit out until it yields easily to a finger press (about 30 minutes). Always beat the cream cheese alone first until completely smooth – those extra 2 minutes make all the difference. Still lumpy? A quick pass through a fine-mesh sieve can save the day!
How Long Does It Last in the Fridge?
This beauty keeps beautifully for 3 days covered in the fridge. After that, the crust starts to soften. I don’t recommend freezing – the texture changes and the topping gets watery when thawed. But let’s be real – it never lasts that long in my house anyway!
Share Your No-Bake Cherry Cheesecake Experience
I’d love to hear how your cheesecake turns out! Did your family go crazy for it like mine does? Snap a photo of your masterpiece and tag me – nothing makes me happier than seeing your cherry-topped creations. Leave a comment below if you tried any fun variations (I’m always looking for new ideas!). Happy no-baking!
Print
Irresistible No-Bake Cherry Cheesecake in Just 15 Minutes
- Total Time: 2 hours 15 minutes
- Yield: 9 servings 1x
- Diet: Vegetarian
Description
A simple and delicious no-bake cherry cheesecake with a graham cracker crust and creamy filling topped with cherry pie filling.
Ingredients
- 2 cups graham cracker crumbs
- ½ cup melted butter
- 2 (8 oz) packages cream cheese, softened
- 1 cup powdered sugar
- 1 teaspoon vanilla extract
- 1 (8 oz) container whipped topping
- 1 (21 oz) can cherry pie filling
Instructions
- In a bowl, combine graham cracker crumbs and melted butter. Press firmly into the bottom of a baking dish to form the crust.
- In a mixing bowl, beat cream cheese, powdered sugar, and vanilla until smooth and creamy.
- Fold in whipped topping until fully combined.
- Spread the cheesecake mixture evenly over the crust.
- Top with cherry pie filling.
- Refrigerate for at least 2 hours before slicing and serving.
Notes
- For best results, chill the cheesecake for at least 2 hours before serving.
- You can substitute cherry pie filling with other flavors like blueberry or strawberry.
- Prep Time: 15 minutes
- Cook Time: 0 minutes
- Category: Dessert
- Method: No-Bake
- Cuisine: American
Nutrition
- Serving Size: 1 slice
- Calories: 410
- Sugar: 30g
- Sodium: 280mg
- Fat: 25g
- Saturated Fat: 15g
- Unsaturated Fat: 8g
- Trans Fat: 0g
- Carbohydrates: 40g
- Fiber: 1g
- Protein: 6g
- Cholesterol: 60mg