
Oh my goodness, you’re in for a treat! This Candy Bar Poke Cake is my absolute go-to dessert when I need something ridiculously delicious with minimal effort. I first made it for my nephew’s birthday party when I forgot to plan a dessert (oops!), and now it’s the most requested recipe in my circle. The magic happens when warm chocolate cake soaks up sweetened condensed milk and caramel through all those little holes – creating pockets of gooey goodness in every bite. Topped with fluffy whipped cream and chopped candy bars, it’s like all your favorite candy shop flavors in one decadent, no-fuss cake that disappears faster than you can say “seconds please!”
Why You’ll Love This Candy Bar Poke Cake
Trust me, this cake is about to become your new best friend for so many reasons:
- No-fuss dessert magic: Boxed cake mix? Check. Store-bought caramel? Check. It’s the kind of recipe where “easy” still tastes like you slaved over it.
- Instant crowd-pleaser: I’ve never brought this to a gathering without someone asking for the recipe. The gooey caramel pockets and candy crunch make people go wild.
- Candy bar playground: Snickers, Milky Way, Twix—whatever’s in your pantry works. I’ve even used leftover Halloween candy in a pinch!
- Potluck superhero: It travels like a dream and looks impressive with zero last-minute fuss—just slice and watch it disappear.
Seriously, this cake solves every “I need dessert NOW” panic with delicious results every time.
Candy Bar Poke Cake Ingredients
Here’s everything you’ll need to create this magical dessert – and trust me, every single ingredient plays a special role in making this cake unforgettable:
- 1 box (15.25 oz) chocolate cake mix – plus whatever eggs, oil, and water your specific box calls for (I always use the “extra moist” version if available)
- 1 (14 oz) can sweetened condensed milk – this is the liquid gold that seeps into all those little holes
- 1/2 cup caramel sauce, room temperature – I like the squeeze bottle kind for easy drizzling, but jarred works too
- 1 (8 oz) tub whipped topping – thawed in the fridge overnight (Cool Whip or your favorite brand)
- 1 cup finely chopped candy bars – about 4 regular Snickers or Milky Way bars (I chop mine into pea-sized pieces for perfect texture)
- Extra caramel and chocolate syrup – for that gorgeous drizzle on top (optional but highly recommended!)
Pro tip from my many trials: Let all your refrigerated ingredients (especially the caramel and whipped topping) sit out for about 15 minutes before using. Room temp caramel flows into the cake better, and the whipped topping spreads like a dream when it’s not ice-cold!
How to Make Candy Bar Poke Cake
Alright, let’s get to the fun part! Making this cake is so simple, but there are a few tricks I’ve learned over the years that make it absolutely perfect every time. Follow these steps, and you’ll have the most decadent, gooey dessert that’ll make everyone think you’re a baking genius!
Step 1: Bake the Base
First things first – grab that trusty boxed cake mix and prepare it exactly as the package says (yes, even us home bakers need shortcuts sometimes!). But here’s my little tweak: always use a 9×13″ pan – it gives the perfect depth for all that yummy soaking liquid. Bake until a toothpick comes out clean, then let it cool for exactly 10 minutes – no more, no less. This is the sweet spot when the cake is still warm enough to absorb all that goodness but firm enough not to fall apart when we poke it.
Step 2: Create Pockets for Flavor
Now for the “poke” part! Grab the handle of a wooden spoon (about 1/4″ diameter) and poke holes 1 inch apart all over the cake, going about 3/4 of the way down. Don’t be shy – I make at least 50 holes! The more holes, the more pockets for that caramel and condensed milk to hide in. Pro tip: wiggle the spoon handle slightly to widen each hole just a bit – it helps the liquids seep in deeper.
Step 3: Soak with Sweetness
Here comes the magic! Slowly pour the sweetened condensed milk over the cake, aiming for the holes (but don’t stress – it’ll find its way). Then drizzle the caramel sauce the same way. I like to use a spoon to gently spread the liquids over any dry spots. Go slow – rushing this step means uneven soaking, and we want every bite equally decadent! Let the cake sit for about 5 minutes to absorb everything while you prep the whipped topping.
Step 4: Chill and Finish
Patience is key here! Pop the cake in the fridge for at least 1 hour (I know, the wait is torture). This chilling time lets all those flavors really set. When you’re ready to serve, spread the whipped topping over the cooled cake, sprinkle with your chopped candy bars, and drizzle with extra caramel if you’re feeling fancy. The contrast of cold whipped cream against the rich, room-temperature cake is pure heaven!
Candy Bar Poke Cake Success Tips
After making this cake more times than I can count (okay, maybe I have a problem), I’ve learned all the little tricks that take it from good to “oh-my-gosh-give-me-the-recipe-NOW” amazing. Here are my battle-tested secrets:
- Room temp caramel is your friend – Cold caramel straight from the fridge can make the cake crack when poured. Let it sit out for 15 minutes first – it’ll flow into every nook and cranny beautifully.
- Blot those candy pieces! Nothing’s sadder than watching chopped Snickers sink into the whipped topping. Pat them dry with a paper towel first – the little bit of extra stickiness helps them stay put.
- Tent with foil if needed – Some ovens run hot and can over-brown the edges before the center’s done. If you spot this happening, just loosely cover with foil halfway through baking.
- The poke-and-wiggle method – Don’t just stab straight down with your spoon handle. Twist it slightly as you pull up to create perfect little tunnels for the caramel to flow into.
- Wait for the magic hour – I know it’s tempting, but that full hour of chilling makes ALL the difference. It lets the condensed milk fully absorb for that signature moist texture in every bite.
Bonus tip from my last potluck disaster: If transporting, add the whipped topping and candy pieces right before serving to keep everything looking fresh. Trust me, I learned the hard way when my “pre-decorated” cake turned into a melty mess in the summer heat!
Candy Bar Poke Cake Variations
Oh, the beauty of this recipe is how easily you can switch it up based on what’s in your pantry or what flavor mood strikes you! Here are my favorite twists that always get rave reviews:
Switch Up Your Candy Bar
This cake is basically a blank canvas for your favorite chocolate treats! Instead of Snickers, try:
- Twix: The cookie crunch adds amazing texture, and the caramel blends perfectly with the soak
- Milky Way: Lighter chocolate flavor lets the caramel really shine
- Butterfinger: For that incredible crispy peanut butter crunch – my nephew’s favorite!
I’ve even tossed in chopped Reese’s Cups when that peanut butter craving hits. No rules here – use whatever makes your taste buds happy!
Salted Caramel Upgrade
Want to take it to the next level? Swap regular caramel for salted caramel sauce and sprinkle a tiny bit of flaky sea salt over the finished cake. The sweet-salty combo is absolute magic – it cuts through the richness in the best way possible. Just don’t go overboard on the salt unless you want to pucker up like you’re at the beach!
Chocolate Lover’s Dream
For my fellow chocoholics, here’s how I make it extra decadent:
- Replace half the caramel with chocolate syrup in the soaking step
- Mix mini chocolate chips into the whipped topping
- Use chopped dark chocolate bars instead of candy for a more sophisticated finish
Last Christmas, I even sprinkled crushed peppermint candies on top for a festive twist. The possibilities are endless – that’s why I keep coming back to this recipe year after year!
Storing Your Candy Bar Poke Cake
Okay, let’s talk about storing this beauty – because let’s be real, there’s a 50/50 chance you’ll actually have leftovers! (Though in my house, it’s more like a 10% chance.) Here’s how to keep your cake tasting fresh and delicious:
Refrigeration is key! Once you’ve added the whipped topping and candy pieces, cover the cake tightly with plastic wrap or transfer slices to an airtight container. It’ll stay perfect in the fridge for up to 3 days – though I doubt it’ll last that long! The flavors actually get better as they mingle overnight.
Now, about freezing… I hate to say it, but this isn’t the best candidate for the freezer. The whipped topping gets weepy when thawed, and the texture turns a bit grainy. Trust me, I learned this the hard way after trying to stockpile slices for emergencies (what? A girl needs her chocolate fixes!). If you must freeze it, do so before adding toppings, and even then, the condensed milk soak might make it a tad soggy after thawing.
Pro tip from my many trials: If you’re making this ahead for a party, I recommend:
- Bake and soak the cake up to 1 day in advance
- Keep it covered at room temperature (the soak actually helps preserve moisture!)
- Add whipped topping and candy just before serving for maximum freshness and crunch
One last thing – if your cake does last until day 3 (impressive!), you might notice the candy pieces start to soften. No worries – just sprinkle on a few fresh pieces right before serving to bring back that perfect crunch. The cake itself stays wonderfully moist thanks to all that caramel goodness sealed inside!
Candy Bar Poke Cake FAQs
I get asked these questions ALL the time when I bring this cake to gatherings – so let me save you some trouble with my tried-and-true answers!
Can I use homemade cake instead of boxed mix?
Absolutely! My go-to is a doctored box mix because it’s quick, but if you’re feeling fancy, use your favorite chocolate cake recipe. Just make sure it’s a sturdy one – super fluffy cakes might fall apart when poked. I’ve had great success with my “never-fail” chocolate cake recipe in a 9×13″ pan.
How do I prevent a soggy bottom?
Ah, the dreaded soggy bottom! Here’s my trick: don’t overdo the condensed milk. One full can is perfect – any more and you risk mushiness. Also, make sure your holes don’t go all the way through to the pan bottom. And that 10-minute cooling window before poking? Non-negotiable – it lets the cake set just enough to handle all that liquid love.
What are the best candy bars for texture?
After years of testing (tough job, I know!), I swear by Snickers or Milky Way. They’ve got that perfect combo of chew, crunch, and chocolate that holds up beautifully. Avoid super soft candies like Three Musketeers – they disappear into the topping. Pro tip: chop your candy into pea-sized pieces – big enough to notice, small enough to get in every bite!
Can I make this ahead of time?
You bet! The soaked cake actually gets better after a night in the fridge. Just wait to add the whipped topping and candy until right before serving – nobody likes a soggy Snickers! I often bake and soak the cake the day before, then do the fun finishing touches when it’s party time.
Help! My caramel won’t soak in!
Don’t panic! If your caramel’s too thick, warm it slightly (10 seconds in the microwave) to make it more pourable. And remember – wiggle that spoon handle when poking holes to create little tunnels. Still stubborn? Use a pastry brush to gently push the caramel into the holes. The cake will forgive you!
Nutrition Information
Okay, let’s be real here – we’re not eating this Candy Bar Poke Cake because it’s a health food! But because I know some folks like to keep track (or maybe just want to know how much extra treadmill time they’ll need), here’s the scoop:
The nutrition values below are estimates based on standard ingredients. Your actual counts might vary depending on the specific brands you use or if you make any of our fun variations (looking at you, extra caramel drizzle lovers!).
Important note: This is a treat meant to be enjoyed in moderation (or not – I won’t judge if you sneak that second slice!). The numbers are just for general reference, not medical advice. Now go ahead and savor every delicious bite without guilt – life’s too short not to enjoy the gooey, chocolatey goodness!
Slice this beauty up, serve it with a big smile (and maybe an extra drizzle of caramel because why not?), and watch it disappear faster than candy at a kids’ birthday party! I can’t wait to hear how your version turns out – trust me, once you see those happy faces after the first bite, you’ll understand why this is my most requested recipe. Snap a pic if there’s any left (good luck with that!) and tag me so I can celebrate your candy bar masterpiece. Now go forth and spread the poke cake joy – your new signature dessert awaits!
Print
Decadent Candy Bar Poke Cake So Good in 4 Simple Steps
- Total Time: 1 hour 45 minutes
- Yield: 12 servings 1x
- Diet: Vegetarian
Description
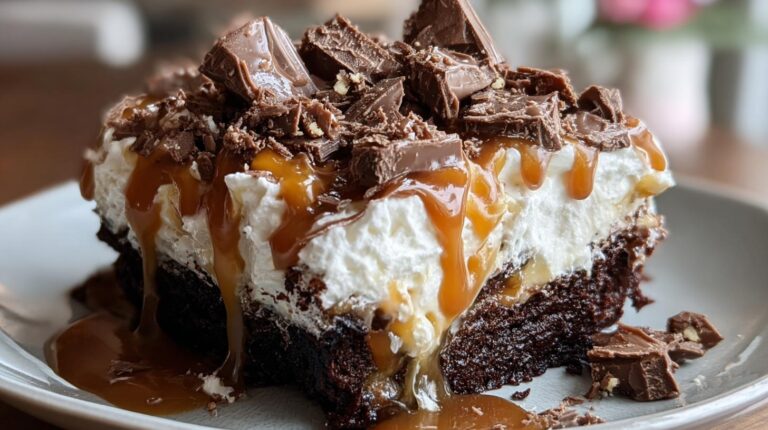
This indulgent poke cake features a moist chocolate base soaked with sweetened condensed milk and caramel, topped with whipped cream and chopped candy bars for a rich, gooey dessert.
Ingredients
- 1 box chocolate cake mix (plus eggs, oil & water as per box instructions)
- 1 (14 oz) can sweetened condensed milk
- 1/2 cup caramel sauce (plus extra for drizzling)
- 1 (8 oz) tub whipped topping (Cool Whip or similar)
- 1 cup chopped chocolate candy bars (Snickers, Milky Way, or your favorite)
- Optional: chocolate syrup or extra candy for garnish
Instructions
- Bake the chocolate cake in a 9×13″ dish according to box directions. Let cool for 10 minutes.
- Poke holes all over the warm cake using a wooden spoon handle.
- Pour sweetened condensed milk evenly over the cake, followed by caramel sauce. Let soak.
- Once cooled, spread whipped topping over the cake.
- Sprinkle chopped candy bars on top and drizzle with extra caramel.
Notes
- For best results, let the cake chill for at least 1 hour before serving.
- Use room-temperature ingredients for easier mixing.
- Customize with your favorite candy bars.
- Prep Time: 15 minutes
- Cook Time: 30 minutes
- Category: Dessert
- Method: Baking
- Cuisine: American
Nutrition
- Serving Size: 1 slice
- Calories: 420
- Sugar: 45g
- Sodium: 320mg
- Fat: 18g
- Saturated Fat: 8g
- Unsaturated Fat: 7g
- Trans Fat: 0g
- Carbohydrates: 62g
- Fiber: 2g
- Protein: 4g
- Cholesterol: 30mg